Reader
Table of Contents
- Accessing the Document Reader
- Introduction
- Document Types
- Document Viewer
- PDF Viewer
- Web Browser
- File Manager
Accessing the Document Reader
Most of Pleco’s document reading functions are part of our paid “Document Reader” add-on, which you can purchase from the Add-ons screen. The one exception to this is the “Clipboard Reader” function, which is available even in our free app.
With the paid Document reader add-on, you’ll see two options in the sidebar menu; “Open Document,” which can be used to access any type of document (including the clipboard), and “Recent Documents,” a collapsible item that reveals a list of your last 3 documents plus an “All Recent Documents” item when tapped.
The collapsed/open status of “Recent Documents” persists even when you exit Pleco, and the Clipboard and Web Readers will each show up in that list if you opened them recently, so “Recent Documents” effectively gives you a very quick way to get back to your favorite type of reader. It also gives you a quick way to flip between documents if you’d like to work with more than one at the same time; assuming that your system doesn’t run low on RAM, we keep the last 3 documents that you opened loaded into memory, so you can switch between them without having to wait for them to reopen / reload.
(in our free app, you’ll see just the solo ‘Clipboard Reader’ sidebar item and no recent document list)
Introduction
Pleco’s built-in document reader helps to streamline the process of reading through Chinese-language documents by making it easy to look up unknown words; you can look up a word in the dictionary simply by tapping on it, instead of having to write it in manually. As of version 3.0, Pleco works with just about every widely-used document format: Text, Word (DOC/DOCX), iWork, PDF, and EPUB are all supported, as are web pages, and we also support copying in text from another app via the clipboard and can even read text embedded into the lyrics of music / podcast files.
Document Types
Text, Word, iWork, EPUB, (offline) HTML, clipboard, and lyrics documents are all presented in some variation of our basic Document Viewer interface. PDF files are presented in their own separate PDF Viewer interface, and web pages are presented in the Web Browser interface.
Document Viewer
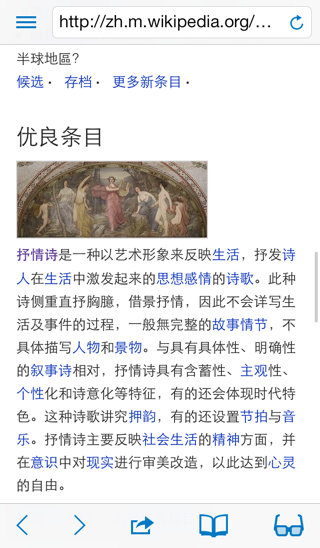
Open any type of offline document other than a PDF file (including clipboards and song / podcast lyrics) and you’ll be presented with something resembling this screen:
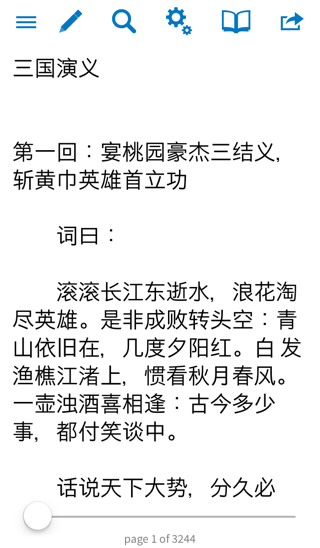
You can tap on any Chinese character / word to pop up its definition (which is probably the main reason you’re using our document reader) - more on that below.
The toolbar buttons vary based on document type - here’s what each one does:
| Icon | Function |
|---|---|
 |
Search the full text of the document. |
 |
Pull up document-specific Settings. |
 |
View / navigate the document’s Bookmarks; for an EPUB file, this button will also let you access the embedded table of contents (if any). |
 |
Create a new bookmark at the current location. |
 |
Attempt to extract the plain text of this document and bring it up in a separate screen (as if it were a text file), useful for rich documents with awkward / hard-to-read formatting or for which regular tap-lookups simply don’t work. |
 |
Edit this document. This is a somewhat buggy / experimental system at the moment, but it works with (short) text files and clipboards; however, for more serious document editing we recommend that you copy or “Open In” your document in a dedicated document editing program like Apple’s excellent (and, for new iPhone/iPad buyers, free) “Pages” app. |
 |
Save this document to a text file, available for ephemeral text (clipboards, lyrics, text extracted via the ‘eyeglasses’ function above) that you might like to hold onto in a more permanent format. |
 |
Only in the clipboard reader: bring up a list of recent clipboards so that you can return to a previous one. If you’d rather we didn’t save these, turn on “Don’t save clipboards” in Settings / Reader. |
 |
Also only in the clipboard reader; return to the newest clipboard, if you’re currently viewing an older one from history. |
Song/podcast lyrics also come with a bottom toolbar allowing you to control the song playback:
| Icon | Function |
|---|---|
 |
Go back 30 seconds in the current song / podcast. (Settings / Reader has an option to increase / decrease this span of time) |
 |
Rewind the song/podcast. It’ll play a little snippet of it every few seconds as it goes back. Tap multiple times to increase the rewind speed. |
 |
Pause or resume audio playback. |
 |
Fast forward the song/podcast; as with (rewind), it’ll play a little snippet every few seconds and you can tap multiple times to increase the speed. |
In documents that support pagination, the slider at the bottom of the screen lets you jump to a specific page in the document - the status bar below that tells you your current page and chapter location.
Popup Definition
Tap on any Chinese character or word in a document and you’ll end up with the following interface:
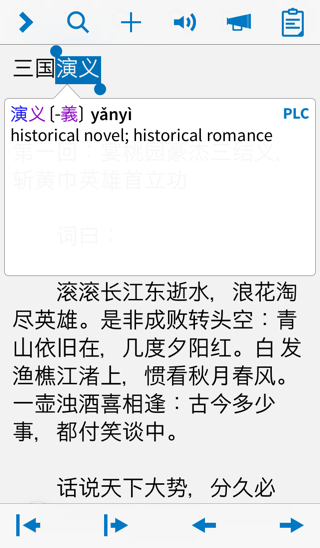
This is pretty much the same as the popup definition interface in our main dictionary. However, if you’ve installed our text-to-speech add-on or are using iOS 7 or later, there’s one important extra button added:  - tap on that to begin reading the document aloud from your current location. While it’s playing, you’ll see a couple of new buttons in the top toolbar:
| Icon | Function |
|---|---|
 |
Hide/show the definition ‘bubble.’ (it will also temporarily hide on its own if the TTS system is playing a word that the dictionary doesn’t have a definition for) |
 |
Adjust the TTS playback speed. |
 |
Stop TTS playback. |
There’ll also be a pause/play icon added to the bottom toolbar to let you pause / resume TTS playback.
If you enable the “Tap side of screen to move” option in Settings / Popup Definition, tapping on the left / right side of the screen will move you to the previous / next word without needing to go all the way to the toolbar. The “Anchor to bottom” option will anchor the definition bubble to the bottom of the screen (rather than putting it right above / below the selected text), and “don’t dismiss on >” will prevent the popup definition interface from disappearing when you return to reader after entering the separate definition screen with the > button.
Search
Tap on the search icon in the toolbar at the top of the Document Viewer screen to bring up this interface:
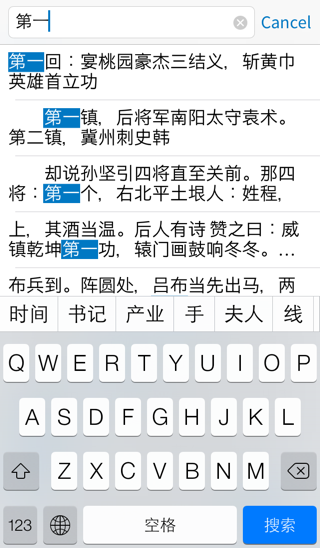
There’s no support here for our own handwriting recognizer yet, so you’ll need to use iOS’ built-in handwriting or Pinyin input methods to enter characters instead. Tap on a search result to jump to its location in the document.
Settings
Tap on the ‘gear’ icon in the toolbar at the top of the Document Viewer screen to bring up this interface:
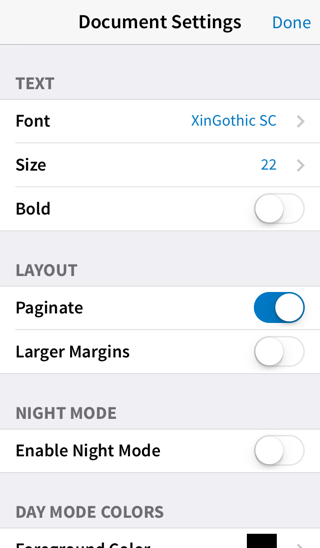
Use these settings to customize the display of the current document; there are also options to make them the default settings for other documents of the same type.
The Font / Size / (for some fonts) Bold options configure the specific Chinese font used to render text. These settings may not apply correctly in a small number of EPUB files - if you encounter such a file, please email us and we’ll be happy to investigate whether there’s any way we can get them working.
Paginate (supported in most document types, but not in EPUBs where at the moment it’s forced on and can’t be turned off) divides up the document into pages which you swipe through horizontally as you would a typical e-book; turn this off to scroll through the entire document vertically instead.
Larger Margins increases the text margins, improving readability in a lot of cases.
Enable Night Mode is a convenient shortcut to the system Night Mode preference in Settings - enabling it here will also enable it there and vice versa. We include it in this screen because right below it are the options to set Day Mode Colors and Night Mode Colors - Foreground Color sets the text color and Background Color the background.
Finally, Make Defaults makes the current settings the default for all other documents of this type (which have not already had their settings customized), and Reset to Defaults returns the document to the default settings.
Bookmarks
Pleco’s document reader includes a full-featured bookmarking system, allowing you to record both web page addresses and positions in text files and return to them later. The bookmark interface is the same in every document type except PDF (including web pages); tap on the Add Bookmark button to create a new bookmark, or the Bookmarks button to return to / organize your bookmarks.
Tapping on the Add Bookmark button will bring up this screen:
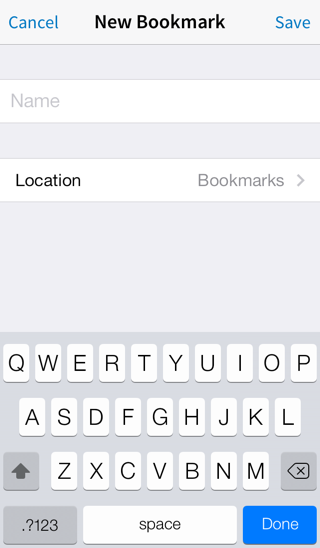
Type in a name for the new bookmark in the “Name” field, and tap on the second button (“Bookmarks” in the above screenshot) to choose a folder to store the new bookmark in.
Tap on the Bookmarks button to bring up this screen:
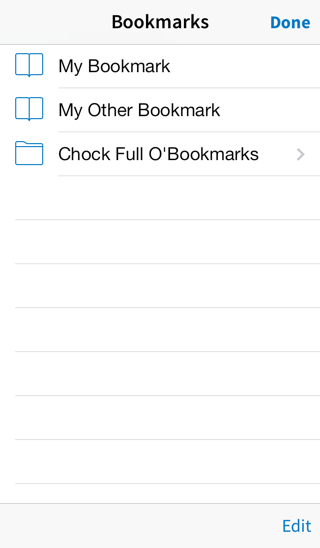
Tap on a bookmark to jump to its saved location, or tap on a folder to view bookmarks inside of that folder. The “History” folder (only used in the web browser) lets you view a list of the last 200 web pages visited and jump to them by tapping on their names. In an EPUB document, you’ll also see a “TOC” option at the top of the screen; tap on that to view (and jump to locations in) the document’s embedded table of contents.
Tap on the Edit button at the bottom right corner of the screen to reorganize your bookmarks:
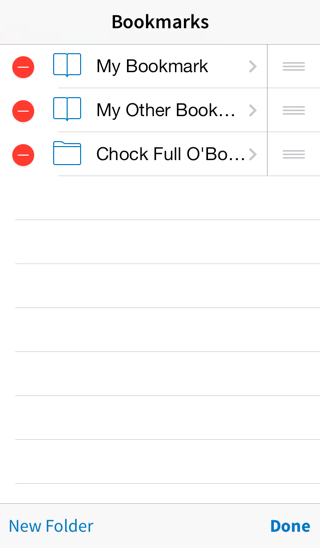
To delete a bookmark or bookmark folder, tap on the minus icon to the left of the bookmark or folder’s name, then tap on the “Delete” button that appears.
To reorder bookmarks, tap on the handle to the right of the bookmark’s name and drag it to its new location in the list.
To create a new bookmark folder, tap on the New Folder button at the bottom left corner of the screen.
To rename or move a bookmark, tap on its name; you can change its name or folder just as in the Add Bookmark screen.
Tap on the Done button at the bottom right corner of the screen to finish editing bookmarks, and the Done button at the top right corner of the screen to exit the Bookmarks screen.
PDF Viewer
Open a PDF file and you’ll be presented with this screen:
Tap on a character to look it up, just as in any other type of document the reader supports. The same Popup Definition interface will appear.
Some PDF files consist purely of scanned images without any embedded text; as far as our document reader is concerned, these are just pictures and there’s nothing in them for it to read. However, you may be able to read these sorts of PDF files using our OCR module.
The toolbar buttons at the top of the screen are similar to their Document Viewer equivalents:
| Icon | Function |
|---|---|
 |
Search the full text of the document. |
 |
View a list of bookmarks you’ve created. |
 |
Bookmark the current page. |
 |
View a zoomed-out version of the entire document (with several pages on the screen at once), useful for quick navigation. |
Drag your finger along the bar at the bottom of the screen to efficiently scroll through the entire document.
Web Browser
Choose “Web Reader” from the Open Document submenu to bring up this screen:
This works pretty much like any other web browser - enter an address in the top bar and press Go, tap on the stop/reload button next to the address bar to stop / reload. The first four buttons in the bottom toolbar also carry the same functions as their Safari equivalents - back / forward / add bookmark / view bookmarks. That “add bookmark” function also includes the option to save the current page to an HTML file in Pleco’s document directory, or to save the next page you load (useful if that page itself refuses to appear normally).
The second button from the right (gear icon) lets you change Pleco’s tap lookup behavior depending on the circumstances of a particular page - you can temporarily disable it if taps are interfering with navigation (e.g. if it won’t let you tap on a particular link), or temporarily enable it even for links / buttons / etc if you’re trying to look up what the text on those mean or if Pleco is mistakenly classifying regular text as links.
The rightmost toolbar option (glasses) attempts to extract the plain text of this web page and bring it up in a separate Document Viewer screen.
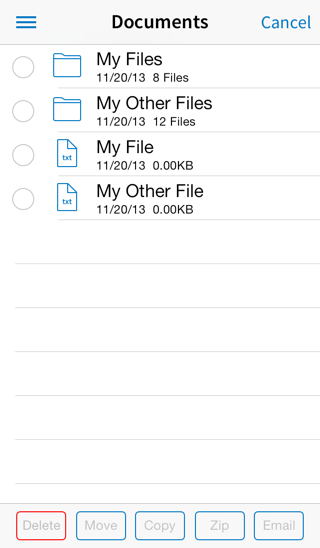
File Manager
Separate from, but closely related to, the document reader is our File Manager screen, accessed from its own separate “File Manager” command under Settings in the sidebar menu.

Tap on New Folder at the bottom of the screen to create a new folder, or New File to create a new, empty text file (which you can then open and edit in the document reader). Tap on a folder to view a list of files in it, or tap on a (supported) document file to open it in the Document Reader. Tap on a .zip archive to extract its contents to a folder.
Tap on the ⓘ button next to a folder to rename it; tap on the ⓘ button next to a file to rename it, “Open In…” the file in another app, change the text encoding that the reader uses to open it (if it’s a text file), or clear its bookmarks / settings (if it’s any kind of reader document).
Turn on “Show File Extensions” in Settings / Reader to show / allow editing of file extensions (useful if you find yourself with a file that’s mis-identified as the wrong type), and turn on “Show hidden files” (same screen) to show files which are normally hidden (most importantly the .plecobookmark files which contain bookmark and settings information for individual documents).
Tap on Edit to bring up a toolbar with some additional options:
Tap on one or more files/folders to highlight them, then tap Delete to delete them, Move to move them to a different folder (removing them from their old folder), Copy to copy them to a different folder (without removing them from their old folder), Zip to package them into a compressed .zip archive (a convenient way to move a lot of files around without going one-at-a-time), or Email to attach them to a new email message.
The root-level screen of the File Manager includes a couple of additional options for getting files into / out of Pleco; see File Sharing Options below for more on those.
File Sharing Options
We support a wide array of options for getting document files into and out of Pleco. Three of these are listed on the main File Manager screen:
Dropbox Folder lets you access a folder of Pleco files on the popular cloud file storage service Dropbox. You’ll be prompted to connect to your Dropbox account the first time you tap on this. Due to Dropbox restrictions, third-party apps are generally only given unrestricted access to files in their own private folders - Pleco’s will appear under /Apps/Pleco Chinese Dictionary, and you’ll only see files from that folder here.
Upload / Download Files turns your iPhone/iPad into a miniature web server to let you easily upload/download files from your computer - see below for more on that.
Share Files lets you share files directly between devices using Bluetooth or WiFi. This is independent of Apple’s new-in-iOS–7 “AirDrop” function, and so works on older iOS devices as well as newer ones and on iOS 6 as well as iOS 7.
In addition to these, Pleco also fully supports the iOS “Open In…” system with all of its supported document types. Choose the “Open In” command (or its equivalent) in Safari or in your favorite file manager / cloud storage app and Pleco should show up as one of the available apps to open the file in; it also works with .zip archives, so you can package up a bunch of files into a .zip and transfer them over in bulk rather than one-at-a-time. Going the other direction, if you tap on the ⓘ button next to a particular file you’ll see an “Open In” option to open it up in another app of your choice.
We also support USB file transfers from iTunes on your computer. For those, connect your device to your computer, open up iTunes, and click on your device’s name in the toolbar at the top of the screen. (if it doesn’t appear there, tap on “Library” and then it should) Click on the “Apps” tab at the top of the screen, scroll down on that screen, and click on the “Pleco” icon in the column on the left side of the screen. Click on a file in that listing and click “Save to…” to copy the file to your computer, or click on “Add…” and select a file on your computer to copy it to your device.
Upload / Download Files
To transfer files using Pleco’s built-in web server, tap on the “Upload / Download Files” item which appears at the bottom of the file list in the main screen of the File Manager to bring up this screen:
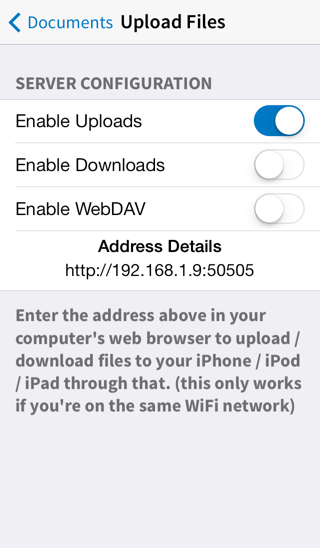
Opening up this screen launches a miniature web server on your iPhone; you can then connect to that web server from your computer to upload or download files from your iPhone.
The Enable Uploads and Enable Downloads switches separately enable uploading and downloading files from your iPhone; we make these separately configurable in case you’re worried about exposing the document files on your iPhone for other people on your local network to freely download. Enable WebDAV lets you bring up Pleco’s document directory as a WebDAV volume (so it’ll be treated a bit like a separate drive on your computer) - do an internet search for instructions on how to use WebDAV on your computer.
Address Details lists the actual web address which you should type into your computer’s web browser in order to access Pleco’s web server. Since nearly all cellular networks and WiFi hotspots are firewalled to block incoming connections from the internet, this will generally only work if your iPhone/iPad and your computer are both connected to the same WiFi network. If you can’t get the connection working correctly, contact Pleco support and we’ll do what we can for you, but it may turn out that the best bet is to use one of the other file sharing options listed above.
Assuming that your iPhone and your computer are able to talk to each other, though, when you enter the address in your computer’s web browser you should see a screen like this:
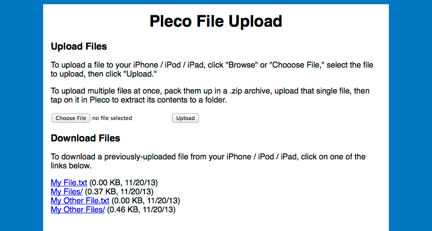
To upload a file, in the “Upload Files” section, click on “Browse,” select the file you want to upload, then click “Upload.” There’s no progress bar, unfortunately, but the page will update with an “Upload Successful” message once the transfer finishes. This interface for this is kind of inconvenient for uploading lots of files, so for large uploads we recommend packaging all of the files up in a .zip archive - you can tap on that .zip file in the file browser to extract its contents to a folder.
To download files, click on the appropriate links under “Download Files.” Click on the name of a folder to view / download files inside of that folder.
Back to Index